本文中,您使用 OpenShift Container Platform 中的s2i-spring-boot-cfx-jaxrs模板作为示例,为 OpenShift Container Platform 应用程序定义资源。使用类似步骤为任何其他 OpenShift Container Platform 应用程序定义资源。
先决条件
-
安装 Red Hat Container Development Kit (CDK) 3。有关安装 CDK 3 的详细说明,请参阅 https://access.redhat.com/documentation/en-us/red_hat_container_development_kit/3.0/html/installation_guide/。
部署 s2i-spring-boot-cfx-jaxrs 模板
按照 使用 IDE 的容器开发工具包 中的说明设置 IDE 以配合 CDK 3 工作。OpenShift Container Platform 的新连接列在OpenShift Explorer视图中,可供使用s2i-spring-boot-cfx-jaxrs模板。
部署模板
-
在OpenShift Explorer视图中,展开连接,右键单击{project name},然后单击New > Application。
-
在New OpenShift Application窗口中
-
在OpenShift project字段中,单击要创建新应用程序的项目。
-
在Server application source选项卡中,向下滚动列表,找到并单击s2i-spring-boot-cfx-jaxrs (quickstart, java, springboot, fis) - openshift。
-
-
单击Finish。
-
在Create Application Summary窗口中,单击OK。
-
在Import OpenShift Application窗口的Git Clone Location字段中,输入您要克隆模板的位置,然后单击Finish。
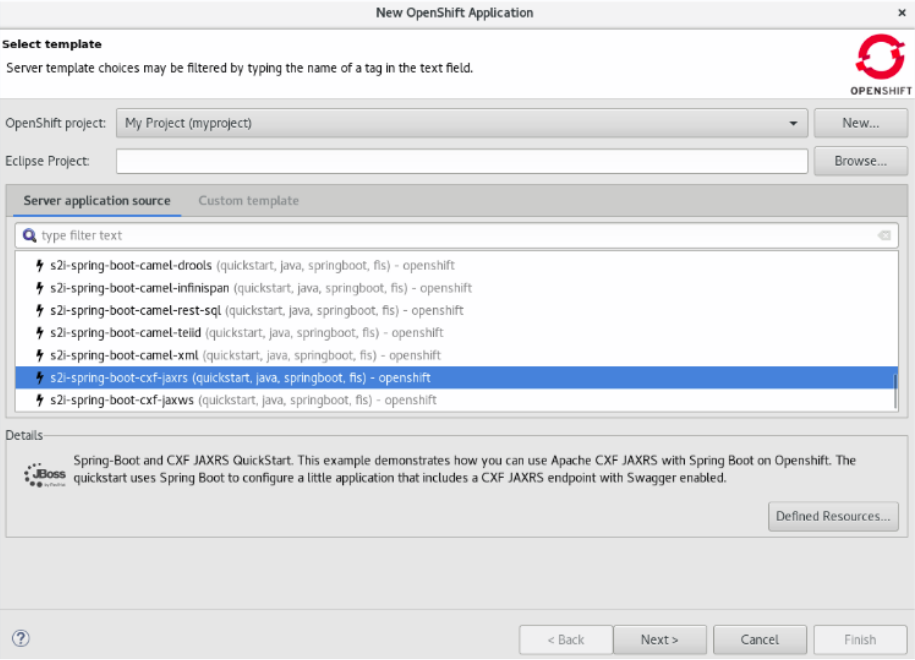 图 1. 选择 s2i-spring-boot-cfx-jaxrs 模板
 -
在OpenShift Explorer视图中,展开项目,展开s2i-spring-boot-cfx-jaxrs应用程序,然后右键单击s2i-spring-boot-cfx-jaxrs-1版本,然后单击Build Log。Console视图显示版本进度。
结果:Console视图显示最新:digest:sha256:{checksum} size:9033 Push 成功消息。
在 Web 控制台中查看应用程序
|
如果您想在终端上查看正在运行的应用程序,则此部分是可选的。 |
当没有服务或路由时,您可以通过 Web 控制台中的“Pod”选项卡查看应用程序。
要在 Pod 中查看应用程序
-
在 Web 控制台中,依次单击“应用程序”>“Pod”,然后单击 s2i-spring-boot-cfx-jaxrs-1 pod。
-
单击“日志”选项卡。
-
在日志中,找到 Jolokia:使用 URL https://172.17.0.6:8778/jolokia/启动的代理,并复制 IP 地址(在本示例中为 172.17.0.6)。
-
单击“终端”选项卡。
-
在终端中,键入以下命令:
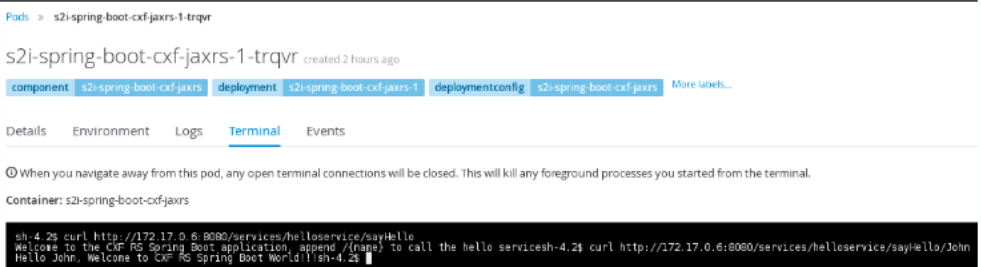
curl http://{IP_address}:8080/services/helloservice/sayHello。 -
按回车键。
-
向下一行追加以下内容:
curl http://172.17.0.6:8080/services/helloservice/sayHello/{your_name},然后按回车键。结果:显示“Hello John, Welcome to CXF RS Spring Boot World!!!”消息,表示应用程序启动并运行。
使用 JSON 文件定义服务和路由
使用 services-route.json 文件为 s2i-spring-boot-cfx-jaxrs 应用程序创建服务,然后为该服务创建路由。在本例中,目标端口是 8080,路由将请求发送至应用程序。
定义资源
-
复制以下内容并粘贴到文件中,将该文件命名为
services-routes.json,并保存。{ "apiVersion": "v1", "kind": "List", "metadata": {}, "items": [ { "apiVersion": "v1", "kind": "Service", "metadata": { "name": "s2i-spring-boot-cxf-jaxrs" }, "spec": { "ports": [ { "name": "8080-tcp", "protocol": "TCP", "port": 8080, "targetPort": 8080 }, { "name": "8778-tcp", "protocol": "TCP", "port": 8778, "targetPort": 8778 } ], "selector": { "deploymentconfig": "s2i-spring-boot-cxf-jaxrs" } } }, { "apiVersion": "v1", "kind": "Route", "metadata": { "name": "s2i-spring-boot-cxf-jaxrs" }, "spec": { "to": { "kind": "Service", "name": "s2i-spring-boot-cxf-jaxrs", "weight": 100 }, "port": { "targetPort": "8080-tcp" }, "wildcardPolicy": "None" } } ] } -
在“OpenShift Explorer”视图中,右键单击项目,然后单击“新建”>“资源”。
-
在“新建 OpenShift 资源”窗口中
-
在“OpenShift 项目”列表中,单击您将应用程序部署到的项目。
-
在“源”窗格中,单击“浏览文件系统”,找到并选择
services-routes.json文件。 -
单击Finish。
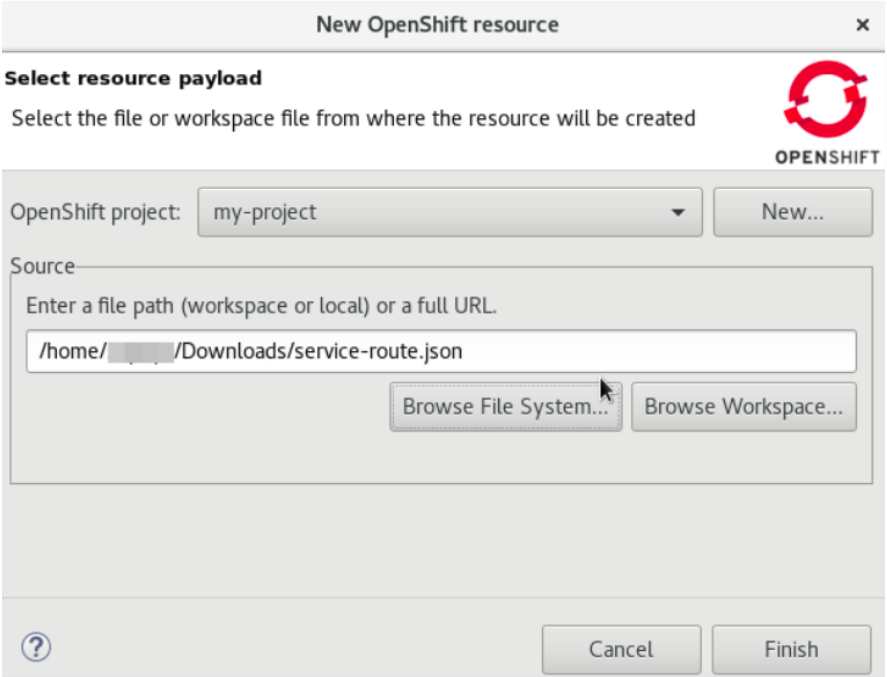 图 3. 选择 service-routes.json 文件
-
-
“创建资源摘要”窗口会显示创建的服务和路由的详细信息。单击“确定”。
-
在“OpenShift Explorer”视图中,右键单击项目,然后单击“显示方式”>“Web 浏览器”。“白标签错误页面”显示该应用程序没有显式映射。
-
在地址栏中,使用
services/helloservice/sayHello/追加 URL。此 URL 现在应如下所示:http://s2i-spring-boot-cxf-jaxrs-{project_name}.{IP_address}.nip.io/services/helloservice/sayHello/. -
按 Enter。Web 浏览器会显示欢迎使用 CXF RS Spring Boot 应用程序,添加 /{name} 以调用 hello 服务 消息。
-
在 URL 末尾,添加一个名称,例如:http://s2i-spring-boot-cxf-jaxrs-{project_name}.{IP_address}.nip.io/services/helloservice/sayHello/John。
结果:该页面显示以下消息:您好,John,欢迎来到 CXF RS Spring Boot World!!!
